
Post by Bec on Sept 23, 2011 19:19:52 GMT -8
Ok, so today we'll be making a signature using GIMP.
What you'll need:
GIMP is a free program with similar features as photoshop. You can download it here and you should be able to download it on both Windows or Mac.
I did have step by step images but then silly me saved them all wrong and I only noticed at the end :S
--------------

Step 1: Choose your image. Generally for Signatures you want to choose the largest possible image with high resolution.
This is the image we're going to use today:
 (I believe Hannah has this image as her current Avatar
  )
)
Step 2 : Open up your image in GIMP and resize. So open up your image File > open... choose your file and you're good to go.
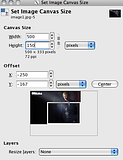
Now it's time to resize. The best way to do this on GIMP is to resize the canvas size so you can then drag your image around to how you like it. Do this by Image > Canvas Now enter in the following. *IMPORTANT* Make sure the little link on the side of your measurements is BROKEN, You should be able to tell if every time you enter in the '150' the '500' changes
Step 3: Move your image around. Simply drag your image till you like how it looks. I like mine like this,
Step 4: Time to change up the background. Duplicate your layer, Image > Duplicate. Now start smudging the background with the smudging brushes. ( You can find the smudge tool in the toolbar- a little pointed finger) you can get interesting textures if you change up your brush. I also burned and dodged some parts to get better texture. This is what i got:
Step 5: Burning/dodging. don't worry if you didn't burn or dodge in the previous step as we are going to do more now. Now click on the dodge/burn tool and select dodge > highlights and have the exposure at around 30. Make your brush a fuzzy circle and size 2.7. Now pick up the highlights of your image, Don't over do it though. Now change the type to burn> Shadows, and do the same to the dark parts, a few clicks should do it.
Step 6 : Now make a new layer and use the bucket tool choose a dark green/blue colour. Now click on the layer (yes the whole document should look green don't freak out ) and change the mode from normal to Dodge and the opacity to 35. It should look something like this:
Step 7: Now create a new copy visible layer. Make a new layer, then Edit > copy visible and paste. Now below the layer panel you should see three tabs brushes, patterns and gradients. Choose the Gradient tab. Do a blue to yellow/orange gradient ( change your foreground and background colour and choose the FG to BG (RBG) gradient) Now change the opacity to something you like. I put it at around 20.
Step 8: Now Create a new copy visible layer again. Now go Filters > Enhance > GRECstoration. Put Strength and anisotrophy to max and click ok. You can leave it as it is or erase everything but Tom.
TAH DAHH!!!
Wow GIMP confuzzled me alot! I hope you guys could follow. If you have any questions let me know. I think i'll stick to photoshop for my personal graphics though
What you'll need:
- GIMP, any version really. Download link below.
- An image you will like to work with.
- Some good music
GIMP is a free program with similar features as photoshop. You can download it here and you should be able to download it on both Windows or Mac.
I did have step by step images but then silly me saved them all wrong and I only noticed at the end :S
--------------
Step 1: Choose your image. Generally for Signatures you want to choose the largest possible image with high resolution.
This is the image we're going to use today:
 (I believe Hannah has this image as her current Avatar )
 Step 2 : Open up your image in GIMP and resize. So open up your image File > open... choose your file and you're good to go.
Now it's time to resize. The best way to do this on GIMP is to resize the canvas size so you can then drag your image around to how you like it. Do this by Image > Canvas Now enter in the following. *IMPORTANT* Make sure the little link on the side of your measurements is BROKEN, You should be able to tell if every time you enter in the '150' the '500' changes

Step 3: Move your image around. Simply drag your image till you like how it looks. I like mine like this,
Step 4: Time to change up the background. Duplicate your layer, Image > Duplicate. Now start smudging the background with the smudging brushes. ( You can find the smudge tool in the toolbar- a little pointed finger) you can get interesting textures if you change up your brush. I also burned and dodged some parts to get better texture. This is what i got:
Step 5: Burning/dodging. don't worry if you didn't burn or dodge in the previous step as we are going to do more now. Now click on the dodge/burn tool and select dodge > highlights and have the exposure at around 30. Make your brush a fuzzy circle and size 2.7. Now pick up the highlights of your image, Don't over do it though. Now change the type to burn> Shadows, and do the same to the dark parts, a few clicks should do it.
Step 6 : Now make a new layer and use the bucket tool choose a dark green/blue colour. Now click on the layer (yes the whole document should look green don't freak out
) and change the mode from normal to Dodge and the opacity to 35. It should look something like this:Step 7: Now create a new copy visible layer. Make a new layer, then Edit > copy visible and paste. Now below the layer panel you should see three tabs brushes, patterns and gradients. Choose the Gradient tab. Do a blue to yellow/orange gradient ( change your foreground and background colour and choose the FG to BG (RBG) gradient) Now change the opacity to something you like. I put it at around 20.
Step 8: Now Create a new copy visible layer again. Now go Filters > Enhance > GRECstoration. Put Strength and anisotrophy to max and click ok. You can leave it as it is or erase everything but Tom.
TAH DAHH!!!
Wow GIMP confuzzled me alot! I hope you guys could follow. If you have any questions let me know. I think i'll stick to photoshop for my personal graphics though