Post by Bec on Aug 31, 2011 21:43:29 GMT -8
Title: Avatar Tutorial
Rating: G
Warnings: I have use Photoshop CS4 (I will make other tutorials with other image editing programs- leave your preferred program in the comments and I'll try to do one on it)
Summary: in preparation for the house cup. Making your own avatar is really easy!
---------------------------------------
Ok so in this tutorial I'm going to make an avatar of Emma Watson. It will be a basic one. A few filters, adjustments maybe a border and voila you're done.
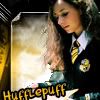
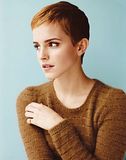
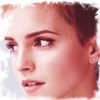
1) Find a suitable image for your avatar. You can pretty much use any image you want. Make sure it's a good quality picture and large enough that it won't be pixelated when you resize. This is the picture I will be using:
2) Ok, next open up a new project (100x100 px)
file>New...
Then drag your image onto the new project.
3) Now it's time to resize. Remember, you don't need to use the whole image.
Edit> Free Transform (there are shortcut keys that will make your life a whole lot easier!)
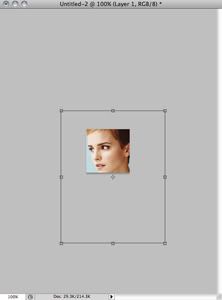
Now drag at the corners (YOU MUST HOLD SHIFT) to resize.
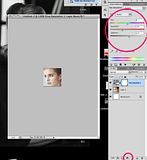
4) Now for the fun part. The first and only rule is to use your imagination! For the sake of the tutorial we are going to play with saturation. So head over to your layers palette on the right and click the half black and half white circle and select Hue/Saturation then in the adjustments panel move the sliders to your hearts content. These are my settings: (click image to make bigger)
5) Now we are going to add a pinkish tone to the image. We're going to add a coloured cloud filter so that there is some texture.
In your colour palette make sure #cc0764 is your foreground colour and make Black #000000 your background colour. Now we will put the "cloud" on
filter>Render>Clouds
Right now your image should look a bit like....this....

6) Now make sure your clouds layer is selected and change it's blending mode to "soft light"
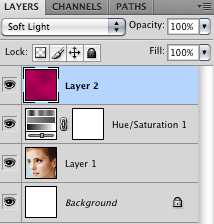
Now change the opacity (or you could leave it as it is if you'd like) of the layer by moving the opacity slider down. I put mine at around 50%

7) Now go back to our "ying yang" circle symbol and select Brightness/Contrast increase the contrast and brightness slightly, or to your liking. I've got brightness at 7, and contrast at 30.
8) Now create a new layer by clicking the Create a new layer button near to the ying yang symbol and next to the trash can. Make sure it is above all other layers.
9) Time to add a border. There are millions of photoshop brushes which you can download off the internet. I have several avatar border brushes. I'm going to be using a grunge frame you can download from here. If you are unsure on how to open them in photoshop there are many tutorials on how to do so on the interwebs
10) Now choose a frame, resize it to fit, line up the edges, choose a colour (I've chosen white- It's best to use a neutral colour or get a sample from your image using the eyedropper tool). You can even play around with the blending mode.
And BAM! you're done! see? easy peasy!
Now run along and make your avatars! I'd love to see them too so do post them Feel free to experiment with colours/filters/brushes and whatnot
Also, feel free to make requests for future tutorials
Edit: Awarded 5 Points by Bec, on 5/9/11
Rating: G
Warnings: I have use Photoshop CS4 (I will make other tutorials with other image editing programs- leave your preferred program in the comments and I'll try to do one on it)
Summary: in preparation for the house cup. Making your own avatar is really easy!
---------------------------------------
Ok so in this tutorial I'm going to make an avatar of Emma Watson. It will be a basic one. A few filters, adjustments maybe a border and voila you're done.
1) Find a suitable image for your avatar. You can pretty much use any image you want. Make sure it's a good quality picture and large enough that it won't be pixelated when you resize. This is the picture I will be using:

2) Ok, next open up a new project (100x100 px)
file>New...
Then drag your image onto the new project.
3) Now it's time to resize. Remember, you don't need to use the whole image.
Edit> Free Transform (there are shortcut keys that will make your life a whole lot easier!)
Now drag at the corners (YOU MUST HOLD SHIFT) to resize.
4) Now for the fun part. The first and only rule is to use your imagination! For the sake of the tutorial we are going to play with saturation. So head over to your layers palette on the right and click the half black and half white circle and select Hue/Saturation then in the adjustments panel move the sliders to your hearts content. These are my settings: (click image to make bigger)

5) Now we are going to add a pinkish tone to the image. We're going to add a coloured cloud filter so that there is some texture.
In your colour palette make sure #cc0764 is your foreground colour and make Black #000000 your background colour. Now we will put the "cloud" on
filter>Render>Clouds
Right now your image should look a bit like....this....
6) Now make sure your clouds layer is selected and change it's blending mode to "soft light"
Now change the opacity (or you could leave it as it is if you'd like) of the layer by moving the opacity slider down. I put mine at around 50%
7) Now go back to our "ying yang" circle symbol and select Brightness/Contrast increase the contrast and brightness slightly, or to your liking. I've got brightness at 7, and contrast at 30.
8) Now create a new layer by clicking the Create a new layer button near to the ying yang symbol and next to the trash can. Make sure it is above all other layers.
9) Time to add a border. There are millions of photoshop brushes which you can download off the internet. I have several avatar border brushes. I'm going to be using a grunge frame you can download from here. If you are unsure on how to open them in photoshop there are many tutorials on how to do so on the interwebs
10) Now choose a frame, resize it to fit, line up the edges, choose a colour (I've chosen white- It's best to use a neutral colour or get a sample from your image using the eyedropper tool). You can even play around with the blending mode.
And BAM! you're done! see? easy peasy!
Now run along and make your avatars! I'd love to see them too so do post them
Feel free to experiment with colours/filters/brushes and whatnot Also, feel free to make requests for future tutorials
Edit: Awarded 5 Points by Bec, on 5/9/11